Galleon Attributes ⚓
A simple yet powerful tool for Webflow Pirates to create dynamic content using data attributes.
🚧 Galleon Attributes is currently in beta. 🚧
Ahoy there! Welcome aboard! 🏴☠️
Galleon Attributes helps you create dynamic, data-driven websites without sailing into the treacherous waters of complex code. Made for Webflow, but works with any tool that supports data attributes.
The Treasure This Tool Provides 💎
- Data Binding: Easily connect your HTML elements to data sources
- Webflow-Friendly: Designed specifically for Webflow projects
- No Heavy Coding Required: Perfect for the low-code/no-code sailors
- Lightweight: Won’t slow down your ship (website)
Set Sail ⛵ (Quick Start)
Add the Galleon Script
Add the following to your Webflow project’s Site Settings > Custom Code > Head Code:
<script
  async
  src="https://cdn.jsdelivr.net/npm/@raae/galleon-attributes@1/dist/script.js"
></script>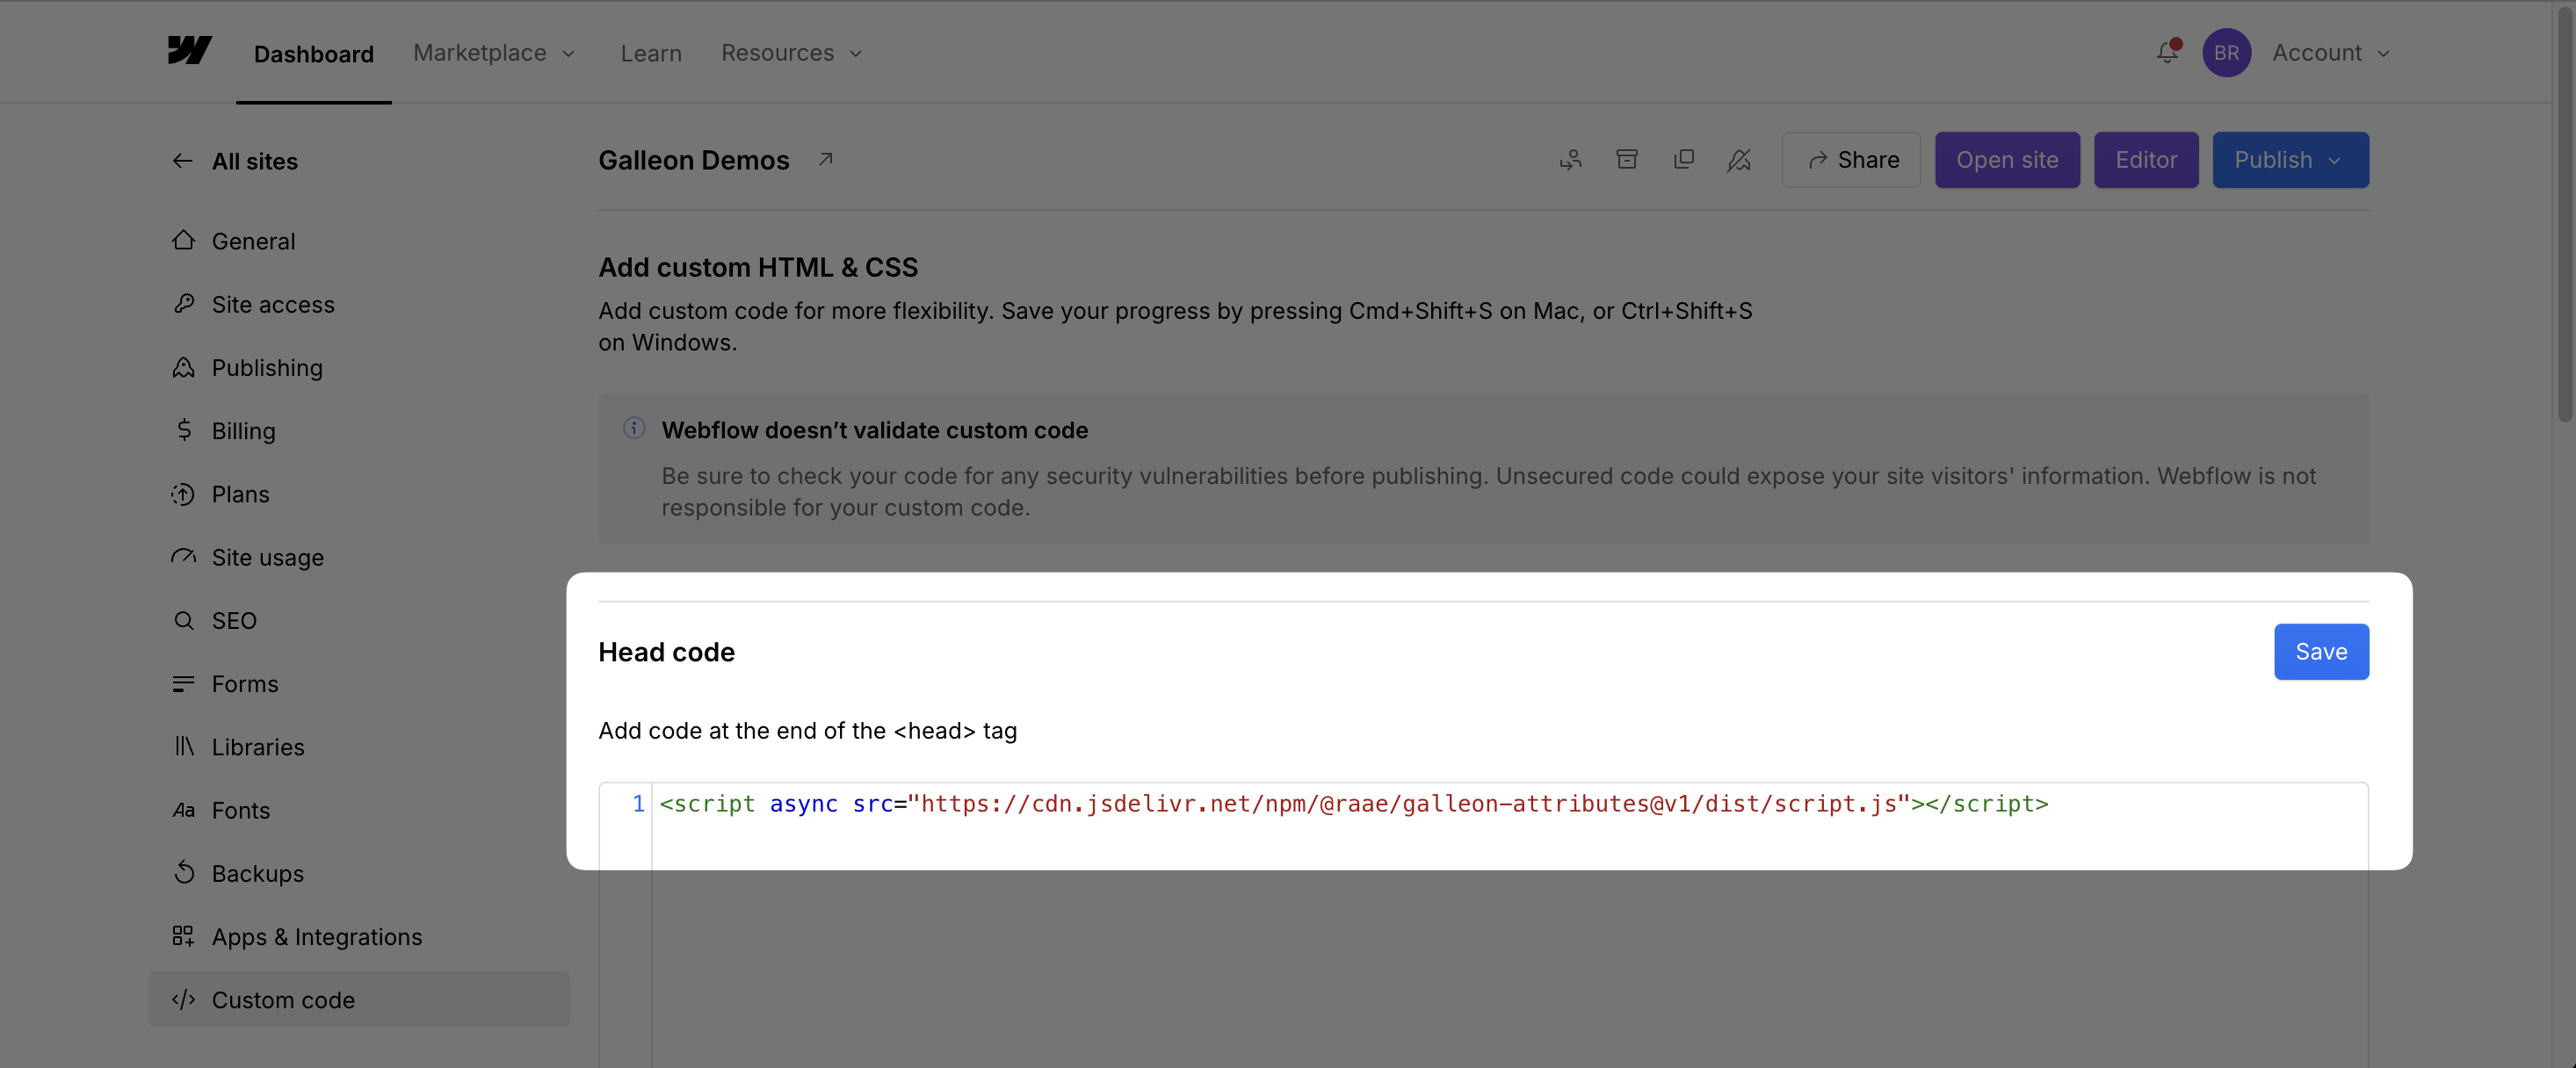
Test Galleon Attributes
Start by using our test APIs to get the hang of it.
💡 [Tip] If you use Outseta, jump to the Test Galleon Attributes with Outseta section.
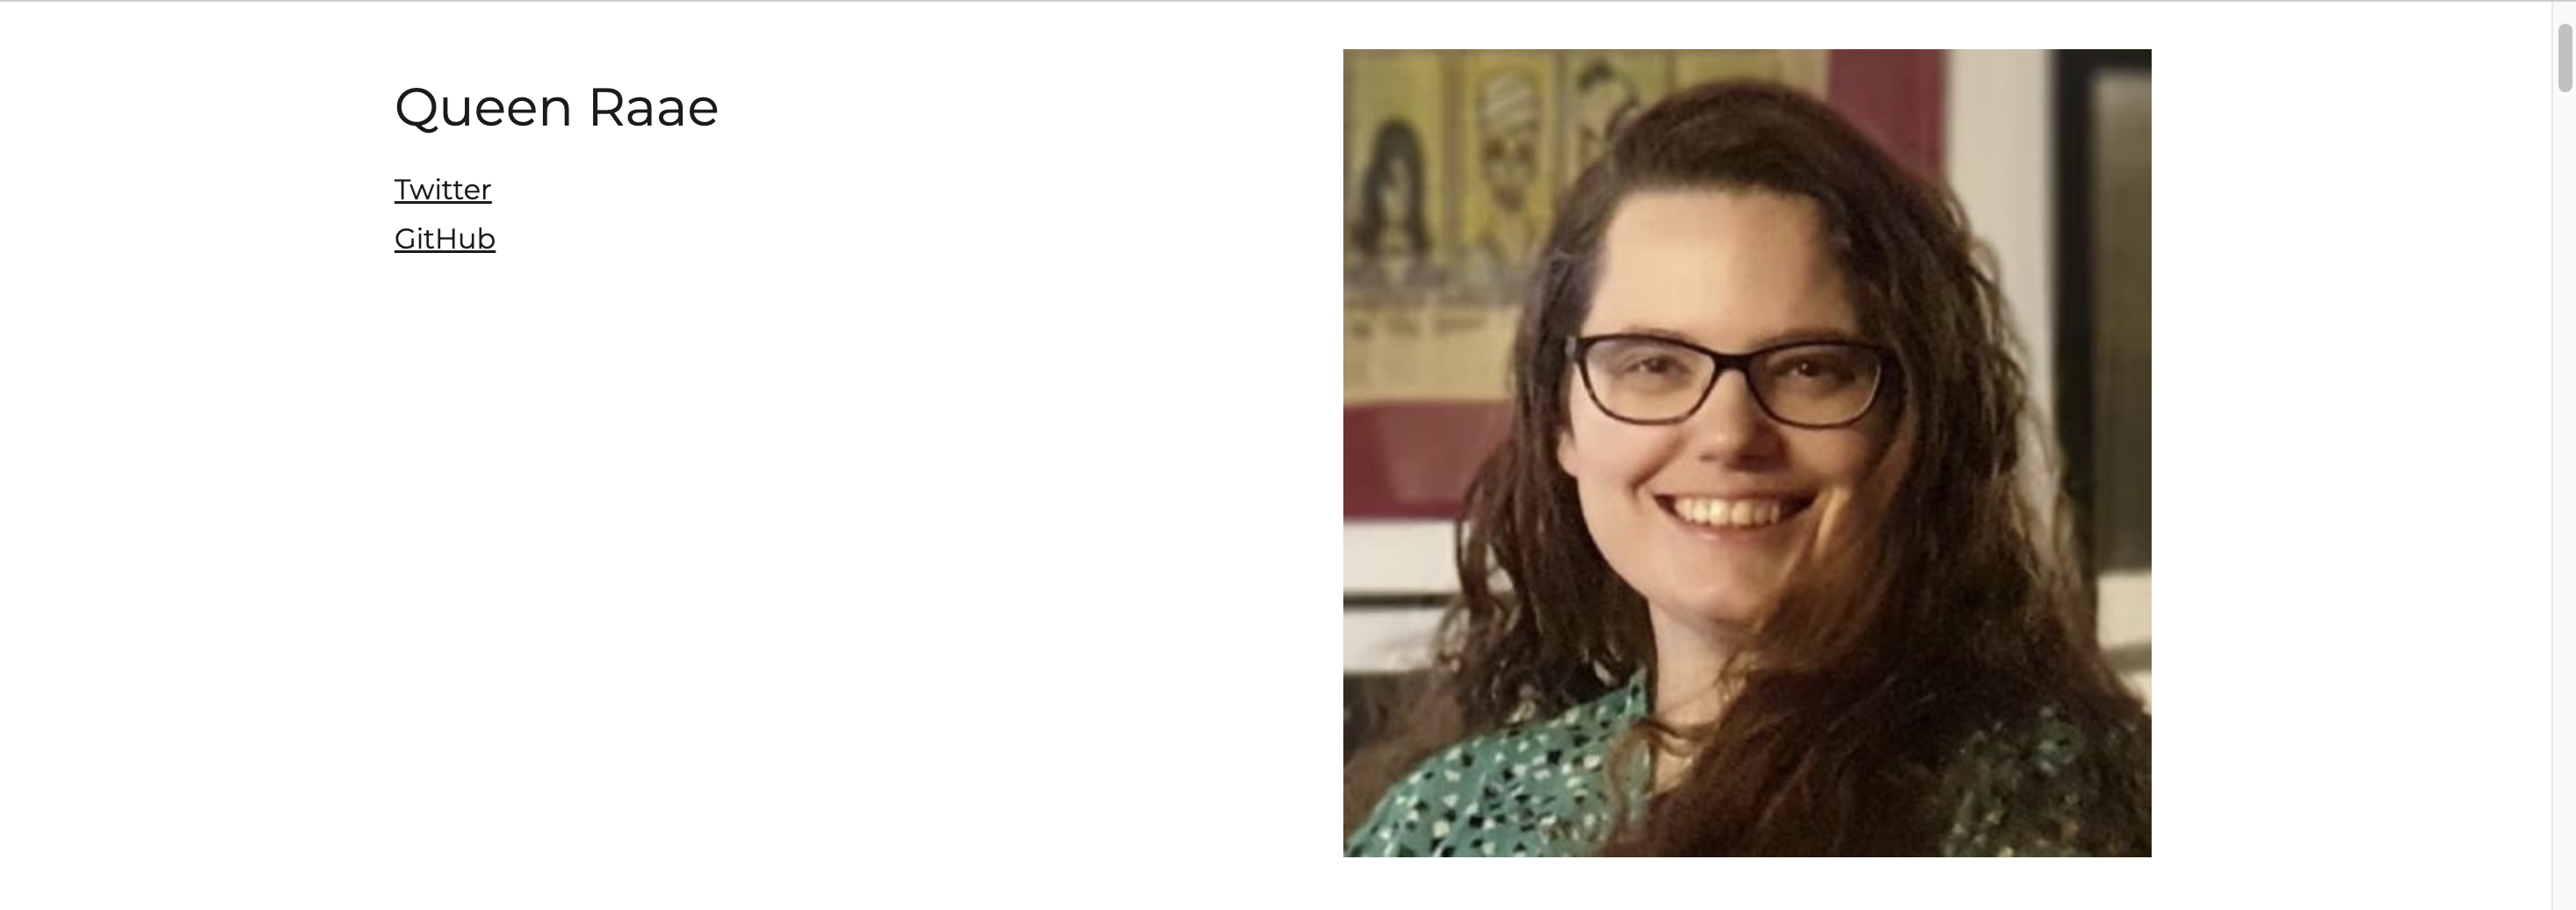
Test API: Queen Raae Info 👑
-
Select a container element to hold the data
➕ Add attribute
gl-getwith valuehttps://galleon.tools/v1/queen.
✨ It will fetch the data from the url and make it available to the element and its children.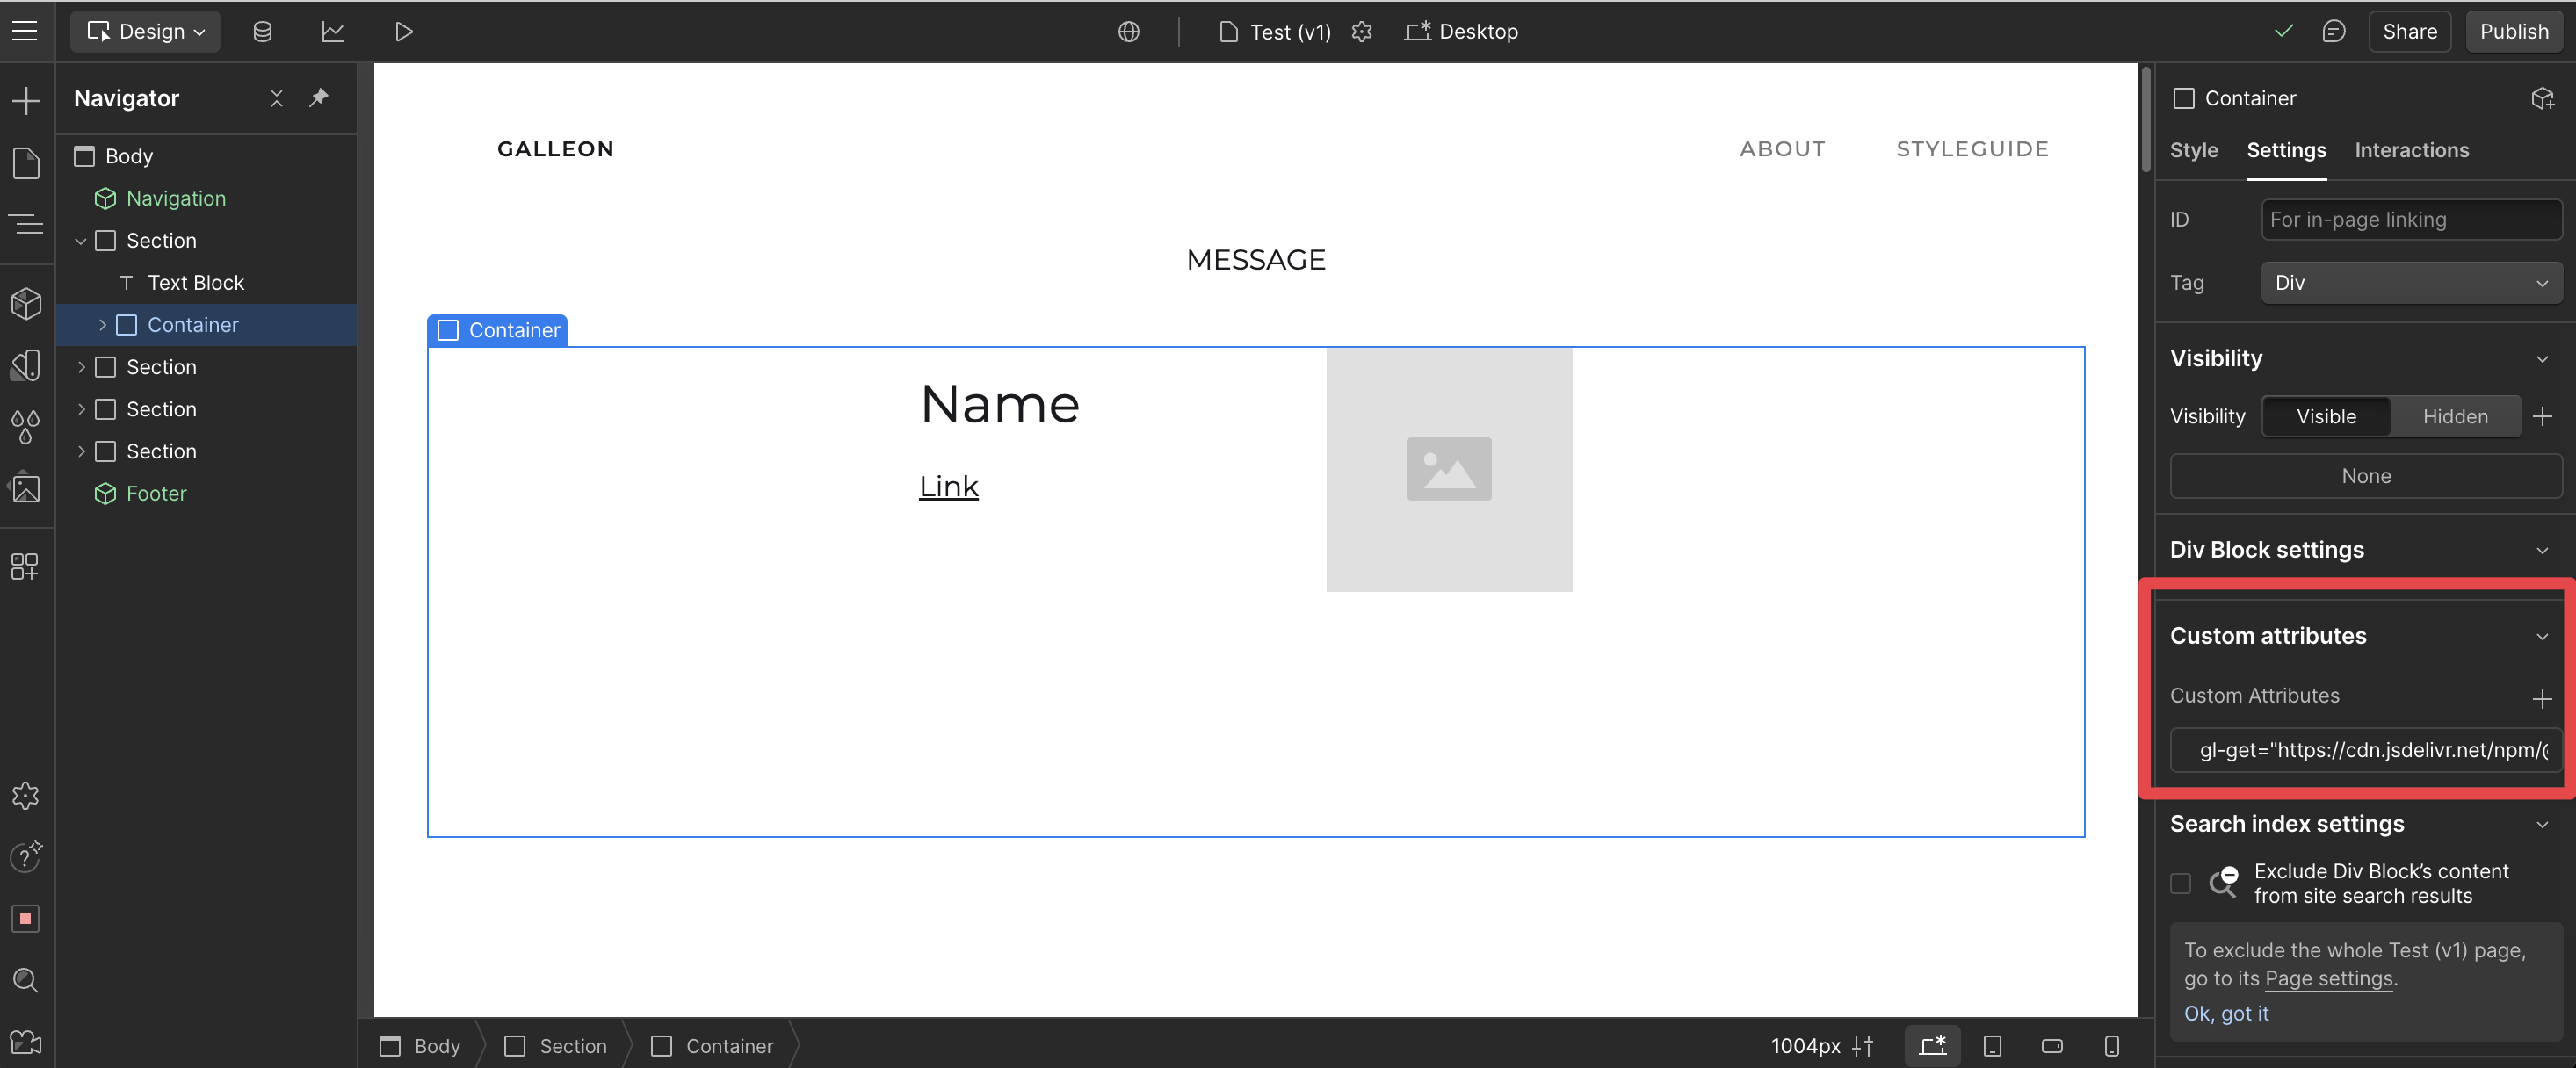
-
Select a multiline text child of the container element
➕ Add attribute
gl-bindwith valuename.
✨ It will bind the text content of the element to thebioproperty of the response.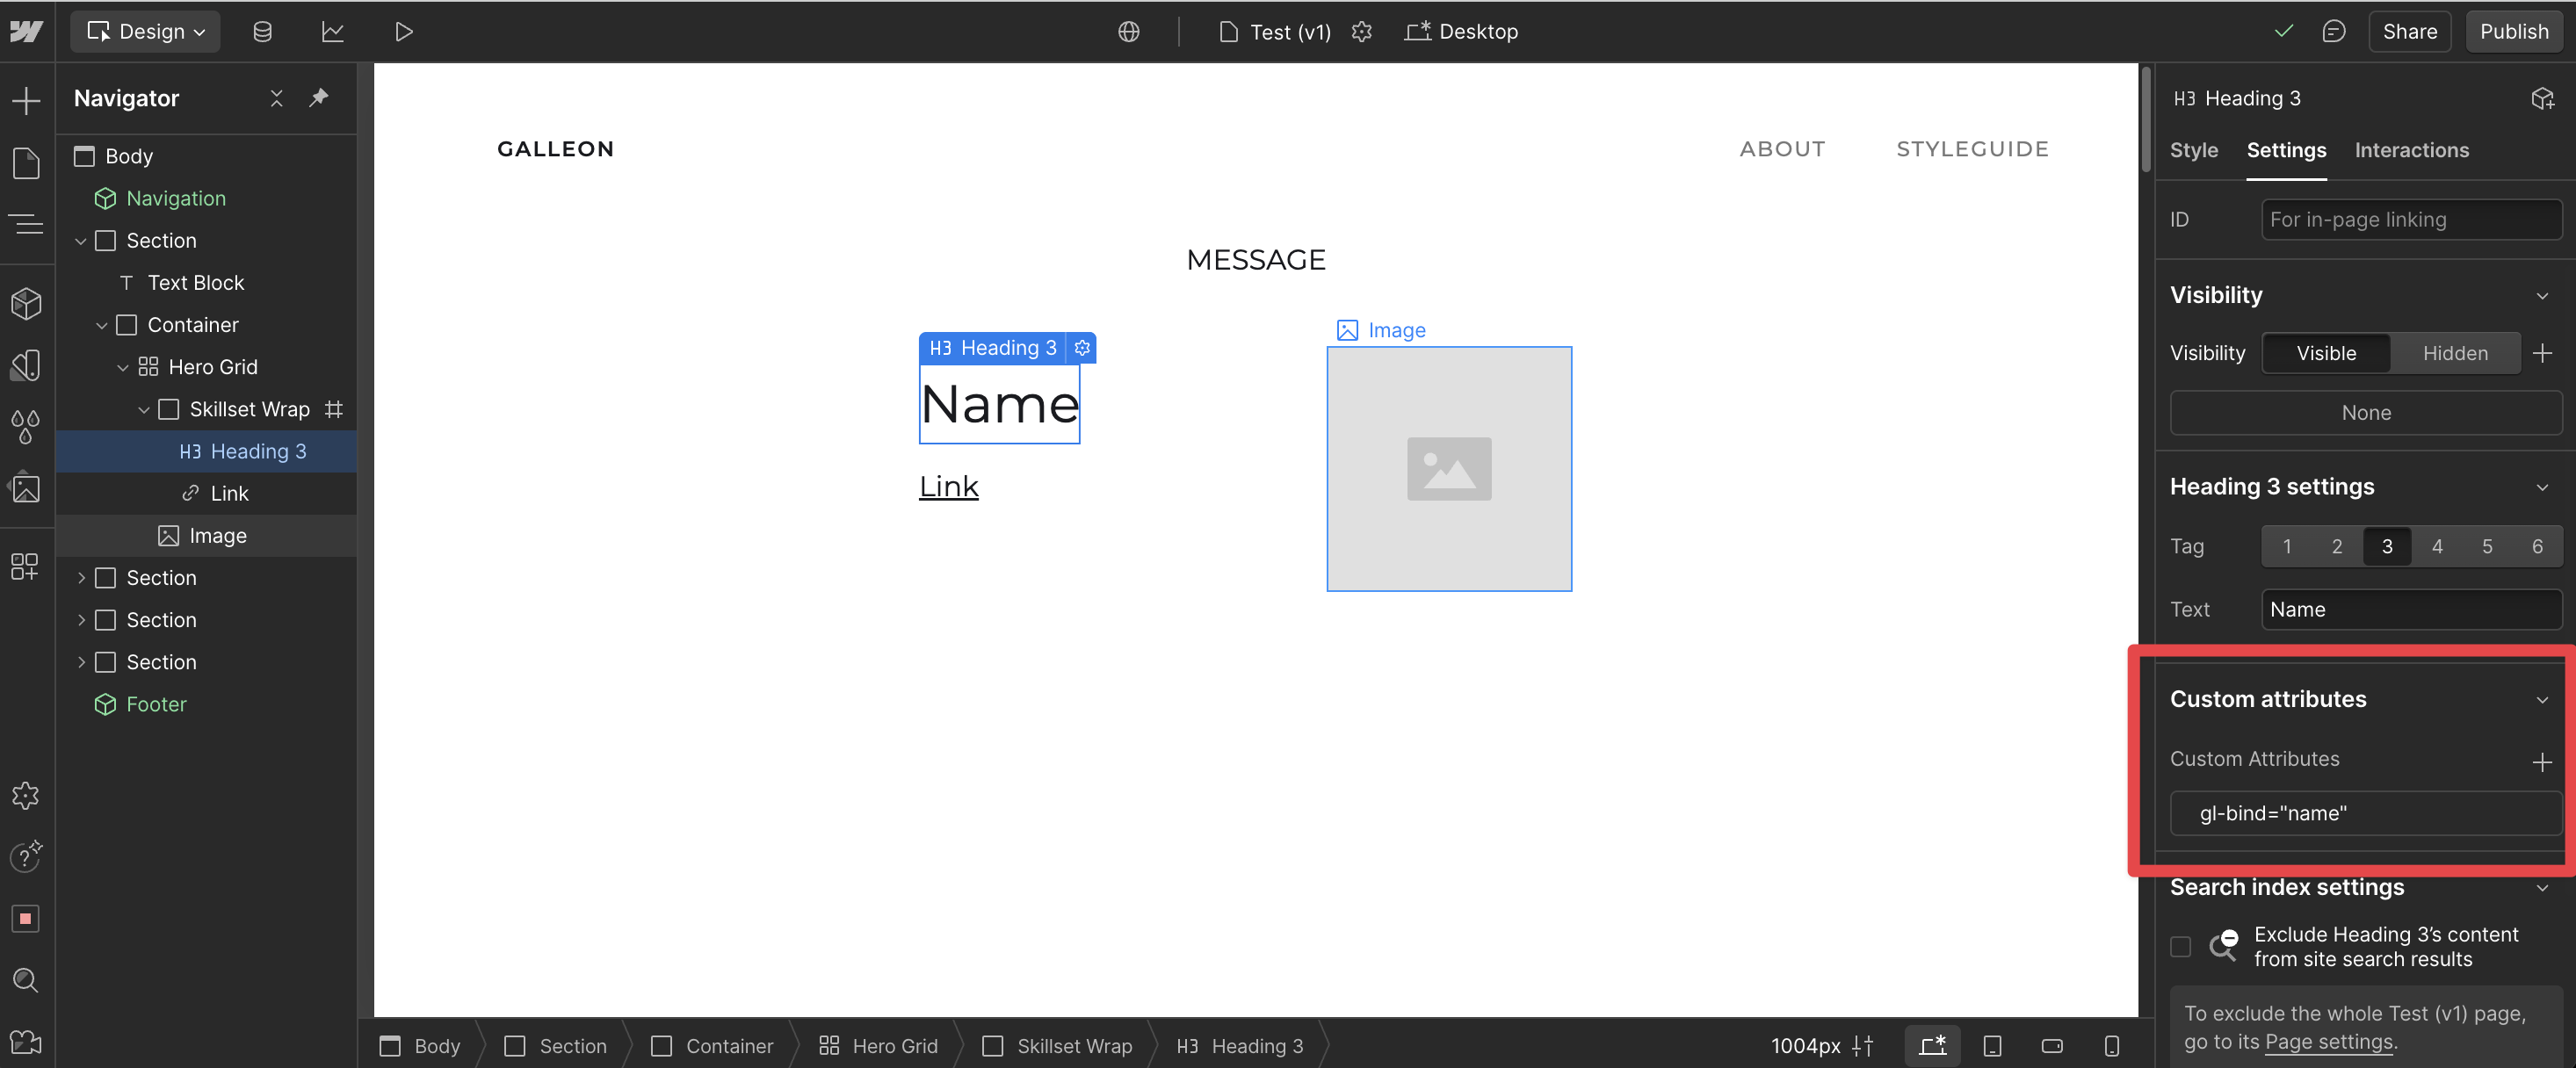
-
Select an image child of the container element
➕ Add attribute
gl-bind-srcwith valueavatar.url.
✨ It will bind thesrcattribute of the element to theavatar.urlproperty of the response.➕ Add attribute
gl-bind-altwith valueavatar.alt.
✨ It will bind thealtattribute of the element to theavatar.altproperty of the response.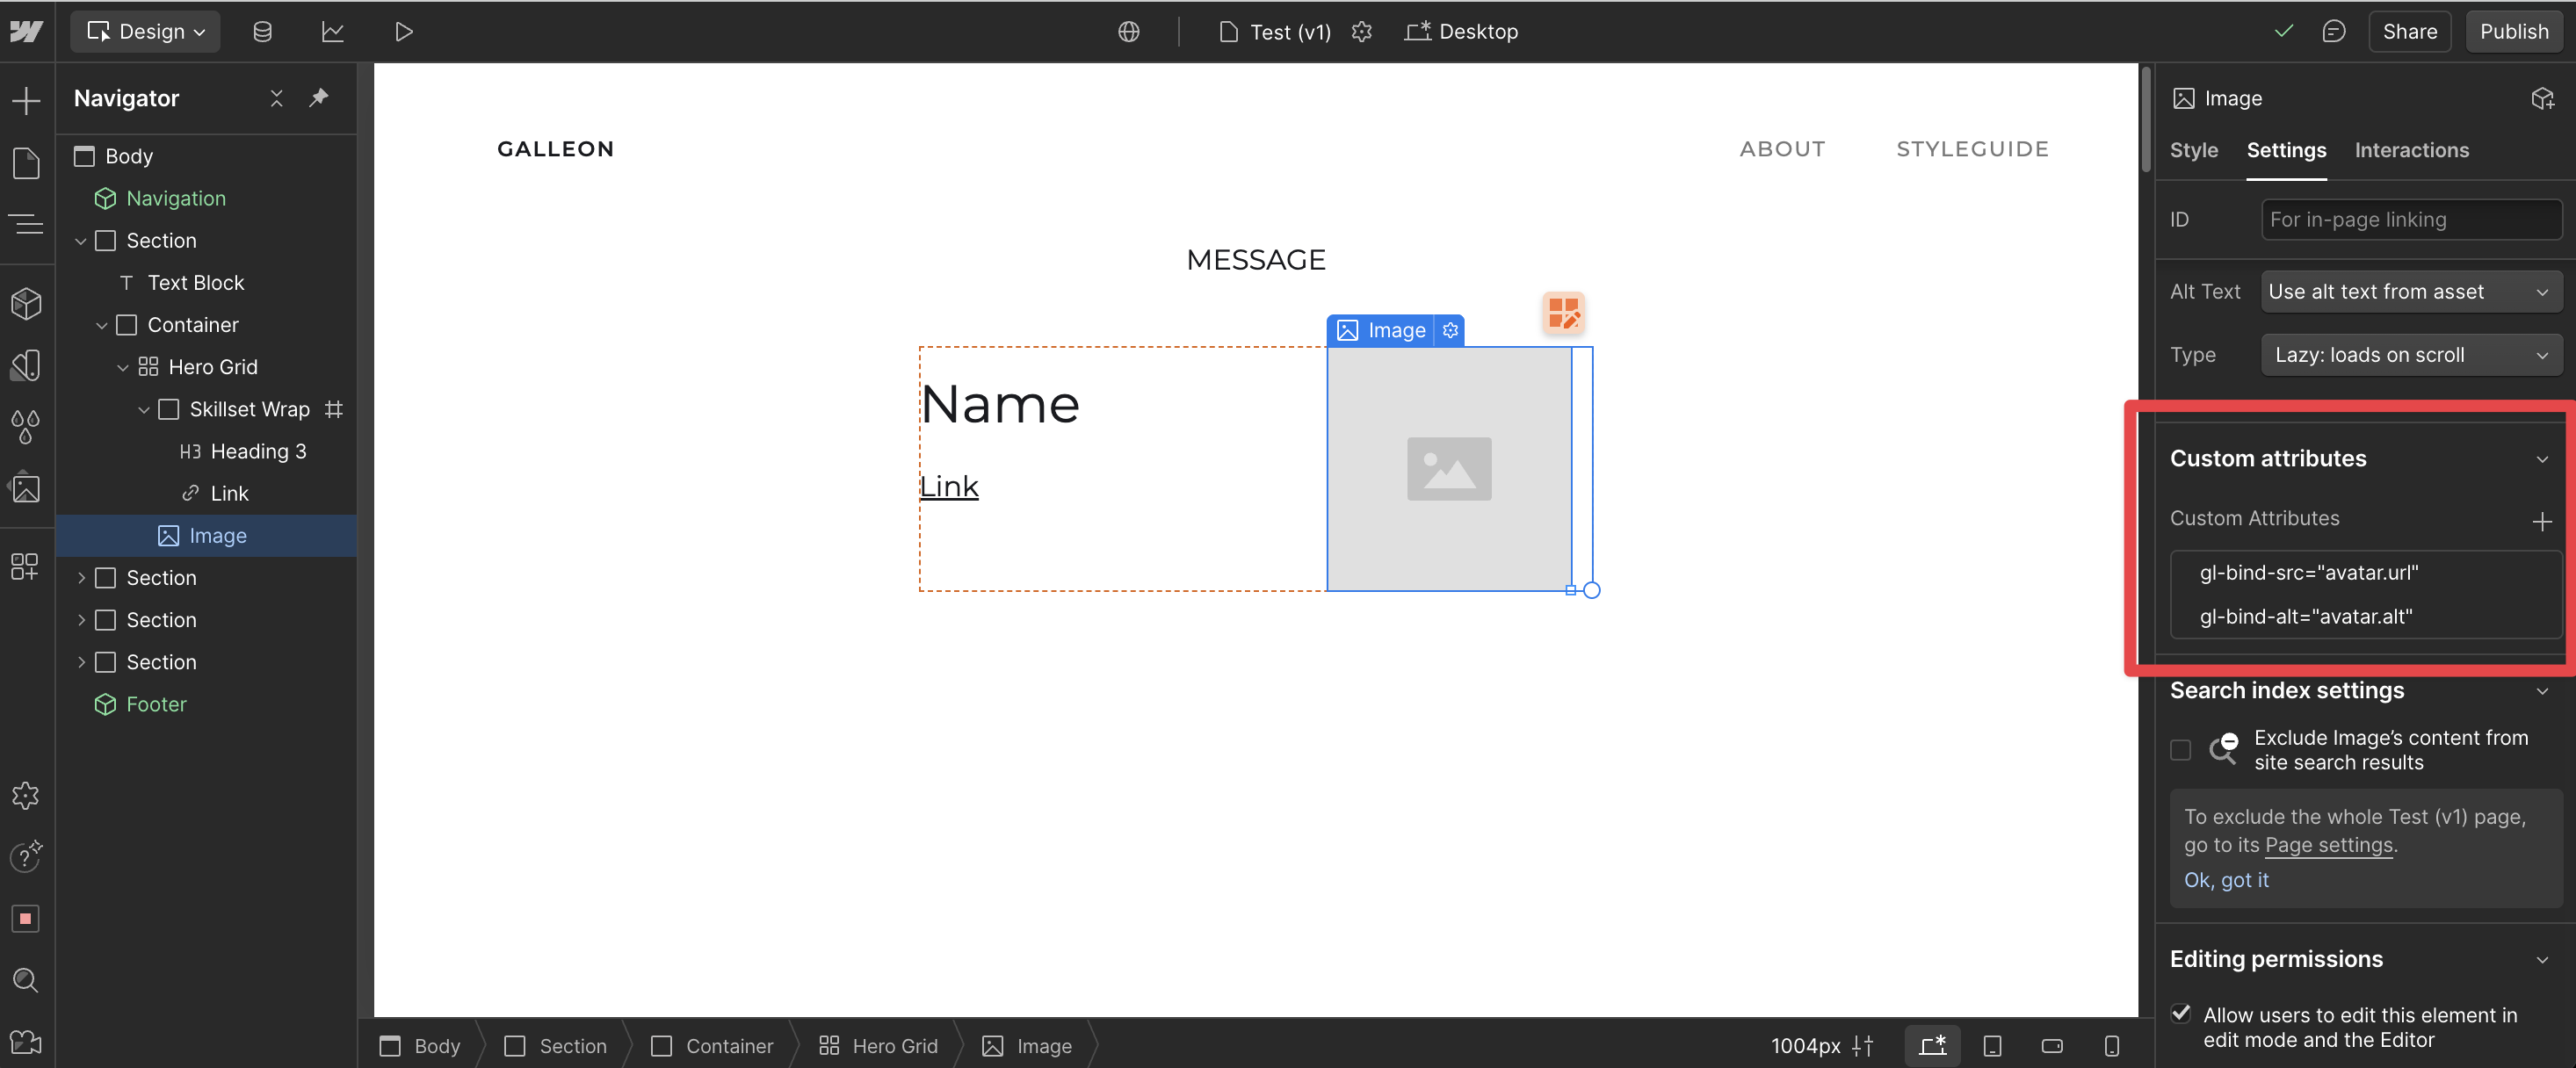
-
Select a link child of the container element
➕ Add attribute
gl-iteratewith valuesocials.
✨ It will iterate over thesocialsproperty of the response and create a copy of the element for each item.➕ Add attribute
gl-bind-hrefwith valueurl.
✨ It will bind thehrefattribute of the element to theurlproperty of thesocialsitem response.➕ Add attribute
gl-bindwith valuelabel.
✨ It will bind set the text content of the element to thelabelproperty of thesocialsitem response.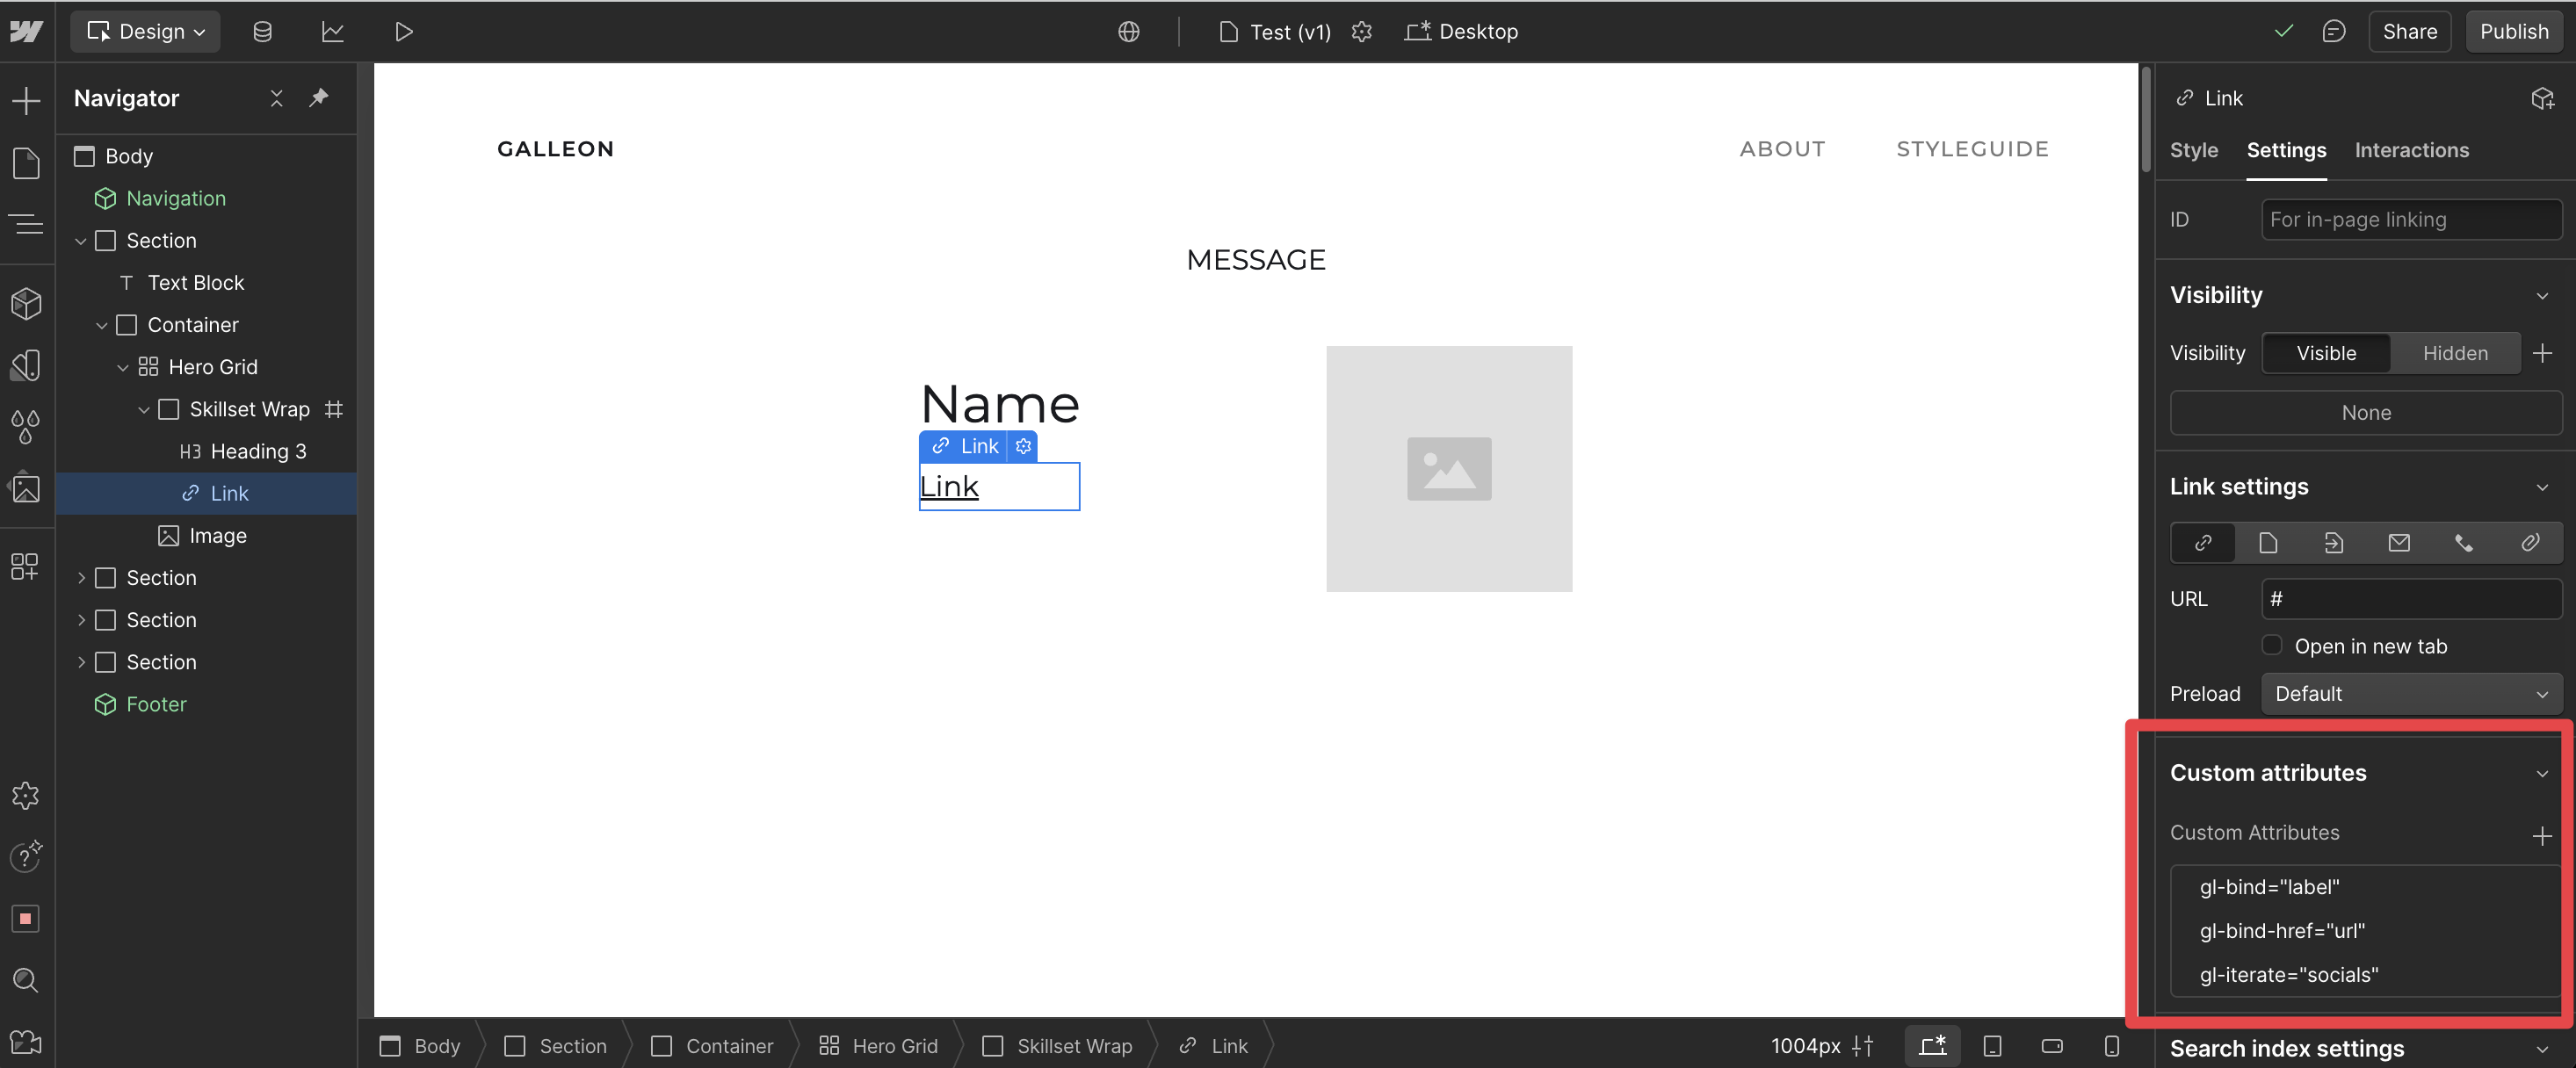
-
Publish your changes and see the magic happen!
Test Galleon Attributes with Outseta
Prerequisites
- An Outseta account
- The Outseta script and configuration added to the head of your site
- Login functionality added to your site using Outseta embeds
- The Galleon script added to the head of your site
Test API: Outseta User Info 🔑
-
Select a container element to hold the data
➕ Add attribute
gl-getwith valuehttps://galleon.tools/v1/outseta/me.
➕ Add attributegl-auth-tokenwith valueOutseta.getAccessToken(), query:access_token.
✨ It will fetch the data from the url and make it available to the element and its children.💡 The test API endpoint
galleon.tools/v1/outseta/meverifies the access token and creates a personalized greeting and summary of the user’s data.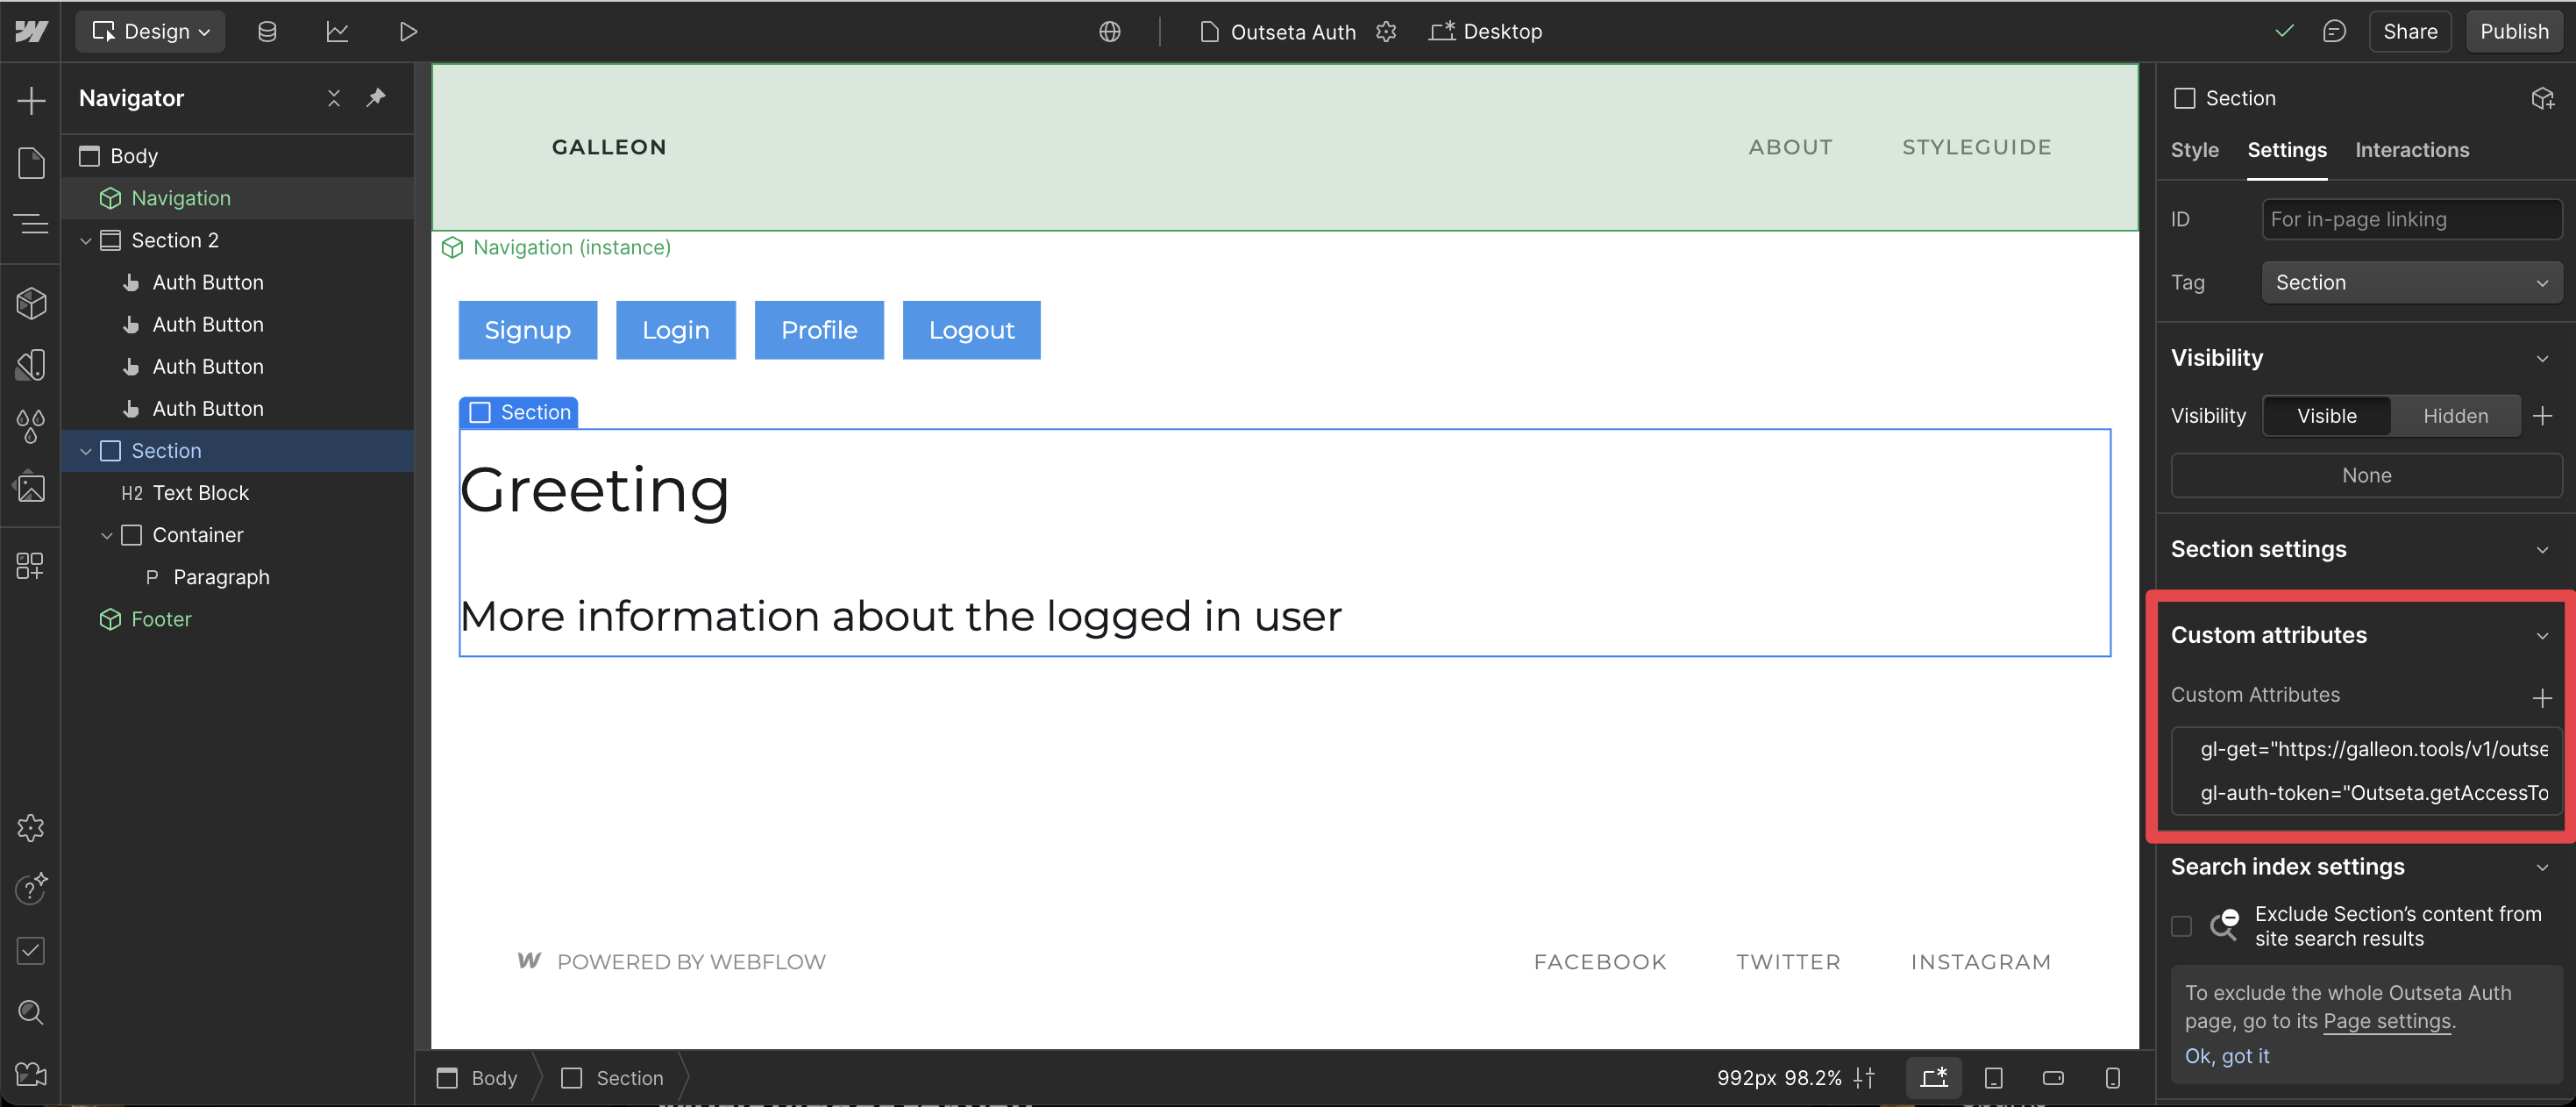
-
Select a text child of the container element
➕ Add attribute
gl-bindwith valuegreeting.
✨ It will bind the text content of the element to the personalizedgreetingproperty of the response.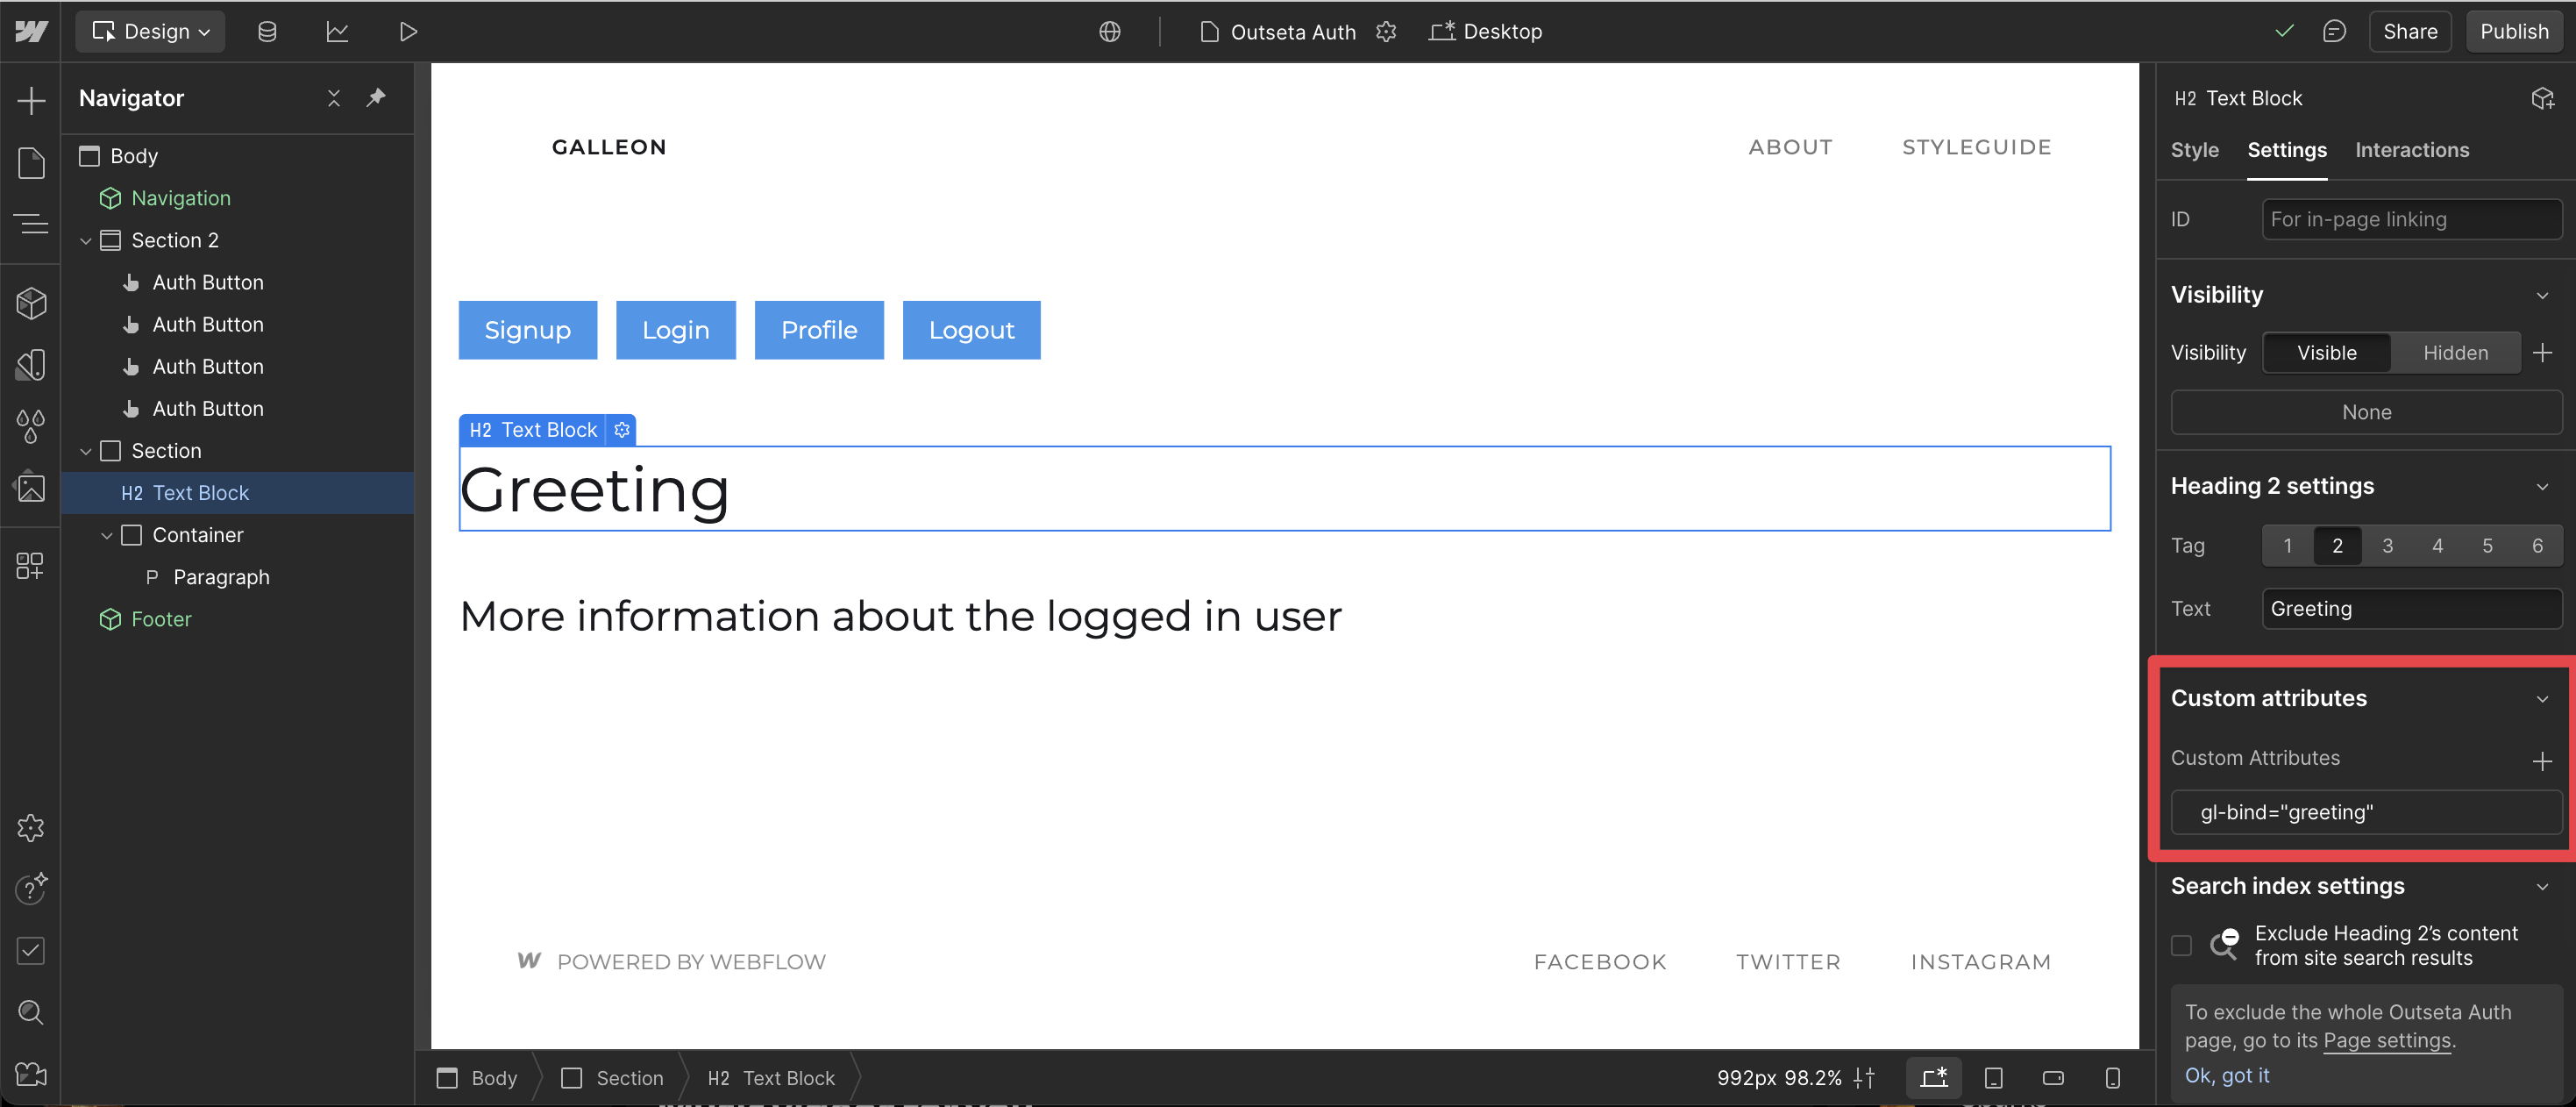
-
Select a multiline text child of the container element
➕ Add attribute
gl-bind-htmlwith valuesummary.
✨ It will bind the html content of the element to the personalizedsummaryproperty of the response.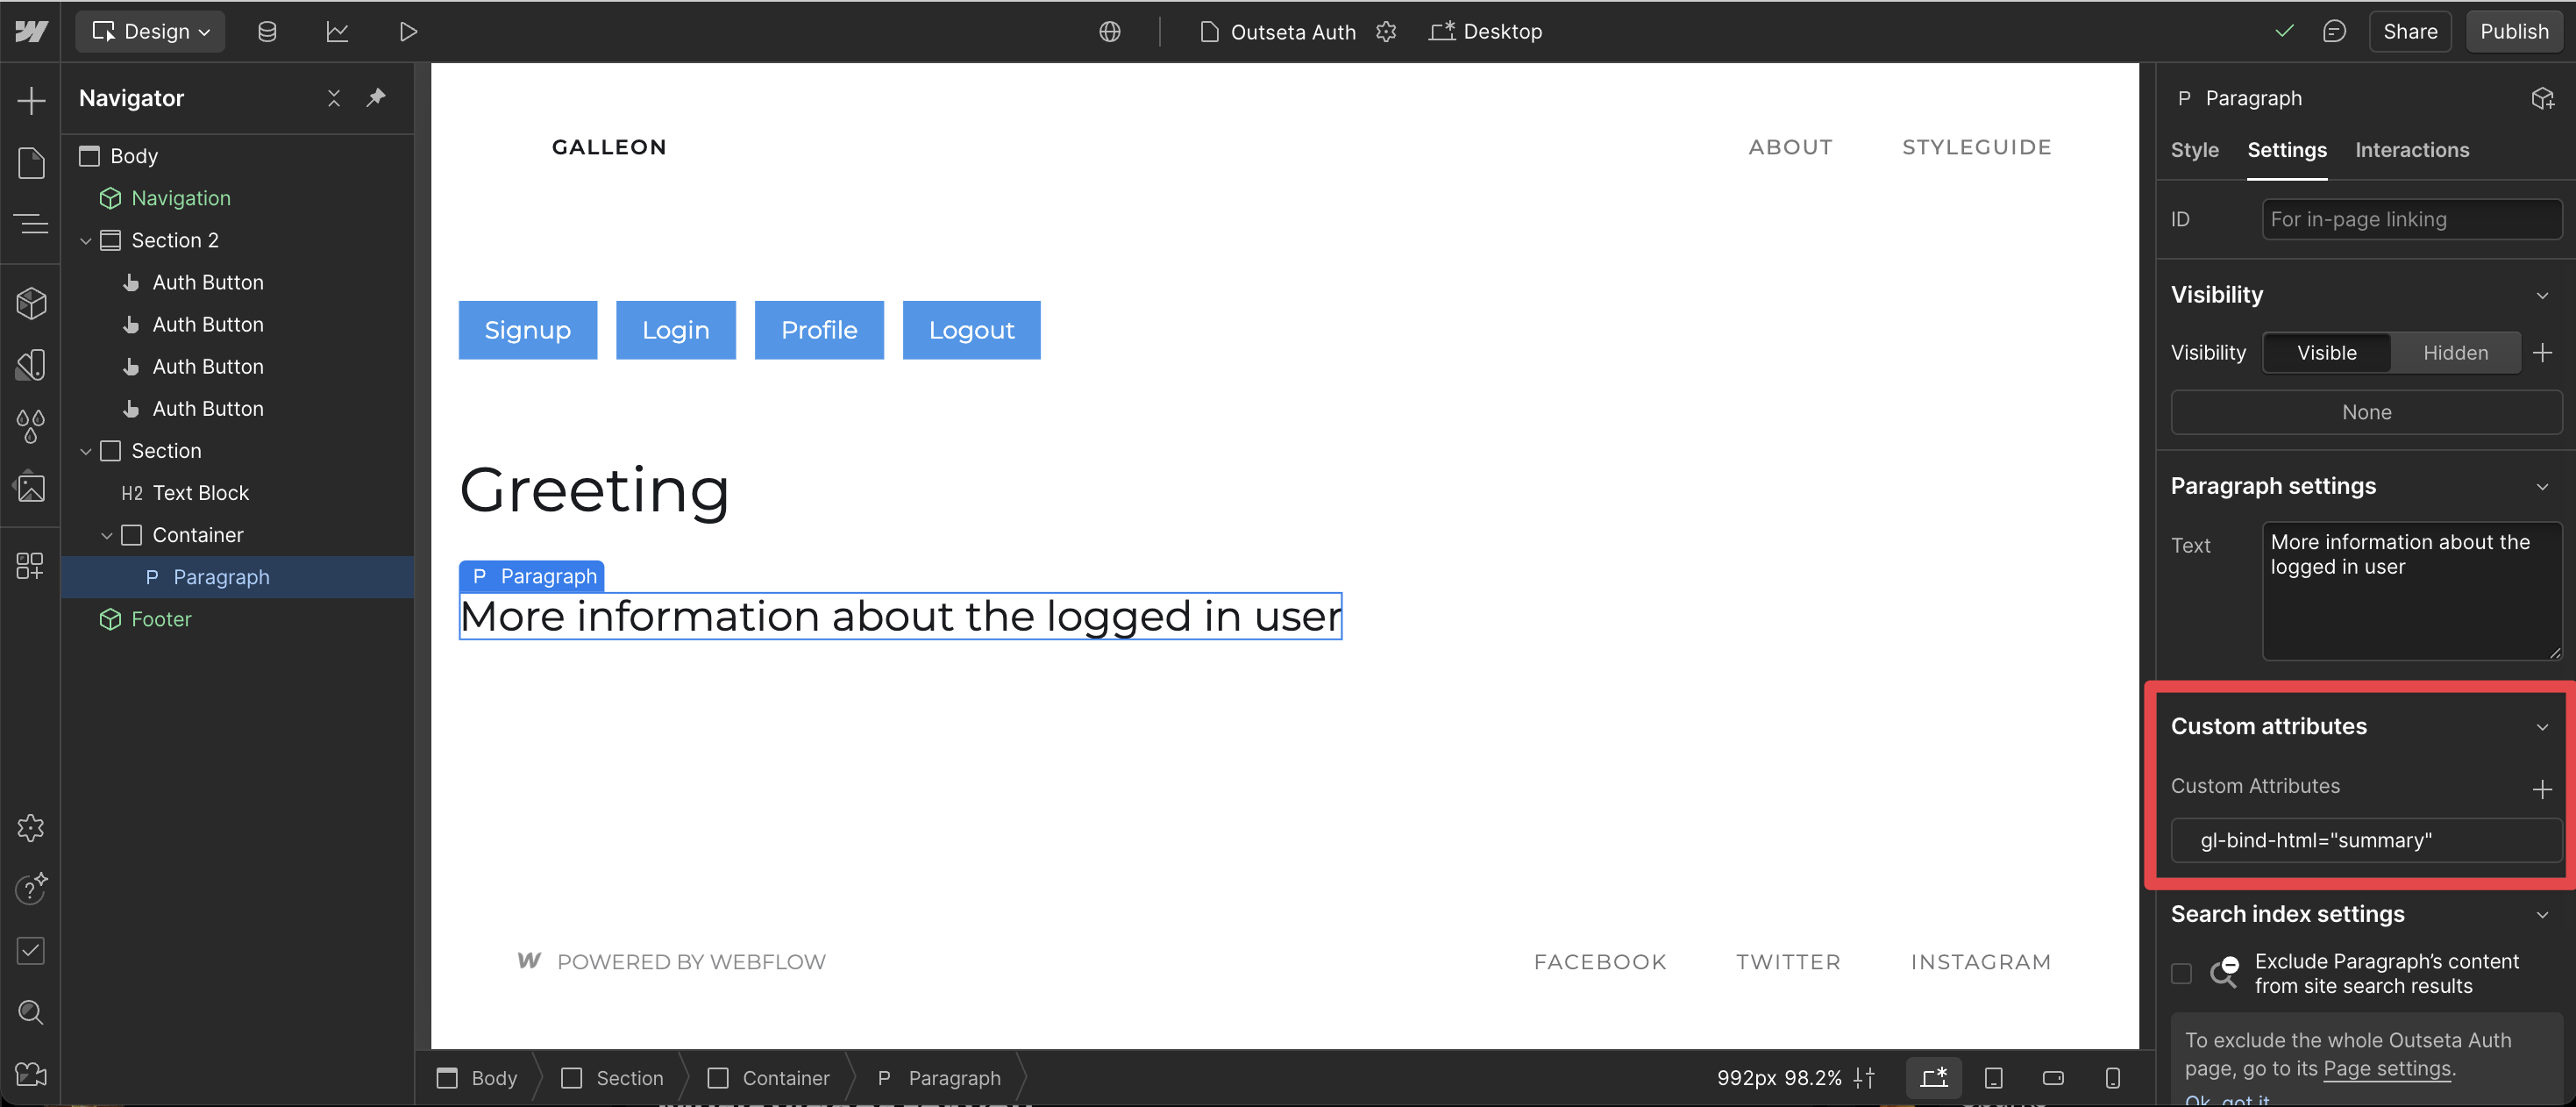
-
Publish your changes and see the magic happen!

💡 [Tip] Not the most exciting user info, but you can use this approach to fetch data from any API that expects the Outseta access token, such as a custom API from your backend devs. Or use a similar approach to fetch data from any other API that requires authentication, see the Authorization section for more details.
Treasure Map (User Guide)
Coming…
The Attributes
| Attribute | Purpose | Example |
|---|---|---|
gl-get | Fetches JSON data from an endpoint | <div gl-get="/api/data.json"> |
gl-bind | Binds element’s text content to a data property | <h1 gl-bind="title">Title</h1> |
gl-bind-[attr] | Binds specific attributes to data properties | <img gl-bind-src="image.url"> |
gl-bind-html | Binds element’s inner html content to a data property | <div gl-bind-html="content"> |
gl-iterate | Iterates through array items | <li gl-iterate="items"> |
gl-auth-token | Authentication source and key | <div gl-auth-token="local:userToken"> |
gl-bind, gl-bind-[attr] and gl-iterate
- Properties: Access properties with dot notation, such as
user.profile.name - Array Indexing: Access specific items with
property[index]syntax, such associals[0].url
Authorization
You can authenticate API requests using the gl-auth-token attribute:
<div
  gl-get="https://example.com/api-with-auth/data"
  gl-auth-token="local:userToken"
></div>
The format is source:key where:
sourcecan belocal(localStorage),session(sessionStorage),query(URL query parameter), or omitted for global scopekeyis the name of your token variable or function
Examples:
gl-auth-token="local:userToken"- Get token from localStorage with key “userToken”gl-auth-token="session:apiKey"- Get token from sessionStorage with key “apiKey”gl-auth-token="query:token"- Get token from URL query parameter with key “token”gl-auth-token="authToken"- Use a global variable named “authToken”gl-auth-token="Outseta.getAccessToken()"- Use a global function named “getAccessToken” from the “Outseta” SDK
Important: When
gl-auth-tokenis specified but no valid value is found, the request will be skipped. This helps prevent failed API requests to protected endpoints.
Multiple Auth Token Sources
You can specify multiple auth token sources in a single gl-auth-token attribute using comma-separated values. The system will try each source in order and use the first one that has a valid value:
<div
  gl-get="https://example.com/api-with-auth/data"
  gl-auth-token="query:token, local:authToken, session:apiKey, ThirdParty.getToken()"
></div>
This will first check for a URL query parameter named “token”, then a value in localStorage under the key “authToken”, then a value in sessionStorage under the key “apiKey”, and finally a value from a global function named “getToken” from the “ThirdParty” SDK. The first source to return a truthy value will be used.
Global Scope
// Auth value in global scope
window.myAuthToken = "a-unique-token";

<div
  gl-get="https://example.com/api-with-auth/data"
  gl-auth-token="myAuthToken"
></div>;
// Auth function in global scope
window.getMyToken = function () {
return "your-custom-token";
};
<div
gl-get="https://example.com/api-with-auth/data"
gl-auth-token="getMyToken()"
></div>;For global scope, you can also use nested paths to access properties and methods on objects (or more usually SDKs).
// Nested object with a token property in global scope
window.Auth = {
  token: "your-custom-token",
};

<div
  gl-get="https://example.com/api-with-auth/data"
  gl-auth-token="Auth.token"
></div>;
// Nested object with auth method in global scope
window.Auth = {
getToken: function () {
return "your-custom-token";
},
};
<div
gl-get="https://example.com/api-with-auth/data"
gl-auth-token="Auth.getToken()"
></div>;// With Outseta script and configuration already in place
<div
gl-get="https://example.com/api-with-auth/data"
gl-auth-token="Outseta.getAccessToken()"
></div>The Galleon Tools
Galleon Attributes will be a part a larger Galleon fleet, aiming to unlock user data for Webflow Pirates:
- Galleon Gateway: Fetch personalized content from tools like Airtable, Notion, Google Sheets, etc.
- Galleon ???: Pitch your user data needs!
Join the Voyage
Captain’s Log (License)
MIT © Queen Raae